Master The Art Of Colorful Dropdown Lists In Excel: A Comprehensive Guide
Hey there, Excel enthusiasts! Are you ready to level up your spreadsheet game? Today, we’re diving deep into one of the most powerful features in Excel: dropdown lists with colors. Whether you're a data analyst, project manager, or just someone who loves organizing information, this guide will teach you how to create stunning, colorful dropdown lists that make your spreadsheets pop. Let’s get started, shall we?
Creating a dropdown list in Excel is like giving your data a voice. It makes your spreadsheets more interactive, error-free, and visually appealing. But wait, there's more! Adding colors to your dropdown lists takes it to the next level. Imagine being able to categorize your data with vibrant hues that instantly convey meaning. Sounds awesome, right? Well, buckle up because we're about to show you how to do just that.
Before we dive into the nitty-gritty, let's set the stage. This guide isn't just about learning a new Excel trick. It's about mastering a skill that can save you time, reduce errors, and make your spreadsheets easier to navigate. So, whether you're a beginner or an Excel pro, there's something here for everyone. Let's make your spreadsheets shine!
- Watch Now Movierulz Kannada 2025 Max New Releases
- Ullu Web Series Your Ultimate Guide To Watching More
Table of Contents
- What is a Dropdown List in Excel?
- Why Use Color in Dropdown Lists?
- Creating a Basic Dropdown List
- Applying Conditional Formatting
- Creating a Color-Coded Dropdown List
- Building a Dynamic Dropdown List
- Customizing Your Dropdown List
- Troubleshooting Common Issues
- Real-World Examples
- Best Practices for Using Dropdown Lists
What is a Dropdown List in Excel?
Alright, let's start with the basics. A dropdown list in Excel is like a mini menu that appears when you click on a cell. It allows you to select from a predefined list of options instead of typing everything manually. This not only speeds up data entry but also reduces the chance of making mistakes.
Imagine you're managing a team and need to track their statuses. Instead of typing "On Leave," "Available," or "Busy" every time, you can create a dropdown list with these options. Sounds efficient, doesn't it?
Here’s the deal: Dropdown lists are super versatile. You can use them for anything from tracking project statuses to categorizing expenses. And with a bit of creativity, you can even add colors to make them more visually appealing.
Why Use Color in Dropdown Lists?
Colors are like the secret sauce in your Excel spreadsheets. They help you quickly identify patterns, prioritize tasks, and make your data more engaging. When you add colors to your dropdown lists, you're not just making your spreadsheet look pretty—you're also improving its functionality.
For example, if you're managing a project, you could use green for "Completed," yellow for "In Progress," and red for "Overdue." This makes it easy for anyone viewing the spreadsheet to understand the status at a glance.
Colors also help in data visualization. They can highlight important information, draw attention to specific cells, and make your spreadsheets easier to navigate. So, why not take advantage of this powerful feature?
Benefits of Using Colors
- Improved readability
- Quick identification of categories
- Enhanced data visualization
- Reduced errors
Creating a Basic Dropdown List
Now that you know why dropdown lists with colors are awesome, let's start with the basics. Creating a simple dropdown list in Excel is easier than you think. Follow these steps:
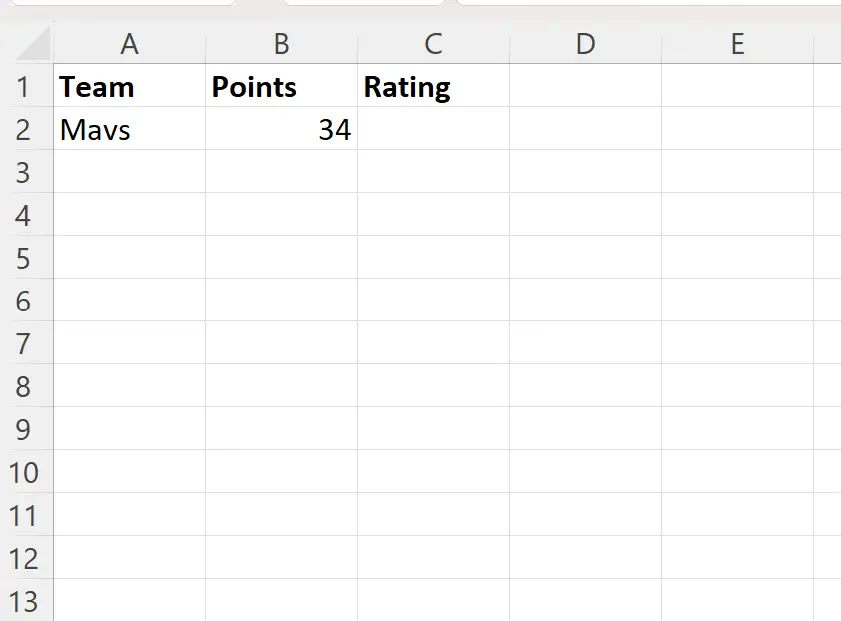
- Select the cell where you want to add the dropdown list.
- Go to the "Data" tab and click on "Data Validation."
- In the "Allow" dropdown, select "List."
- In the "Source" field, enter your list of options separated by commas (e.g., "Option 1,Option 2,Option 3").
- Click "OK" to save your changes.
Voila! You now have a basic dropdown list. But wait, there's more. Let's spice things up by adding colors.
Applying Conditional Formatting
Conditional formatting is like the magic wand of Excel. It allows you to apply formatting rules based on specific conditions. To add colors to your dropdown list, you can use conditional formatting rules. Here's how:
- Select the cells where your dropdown list is applied.
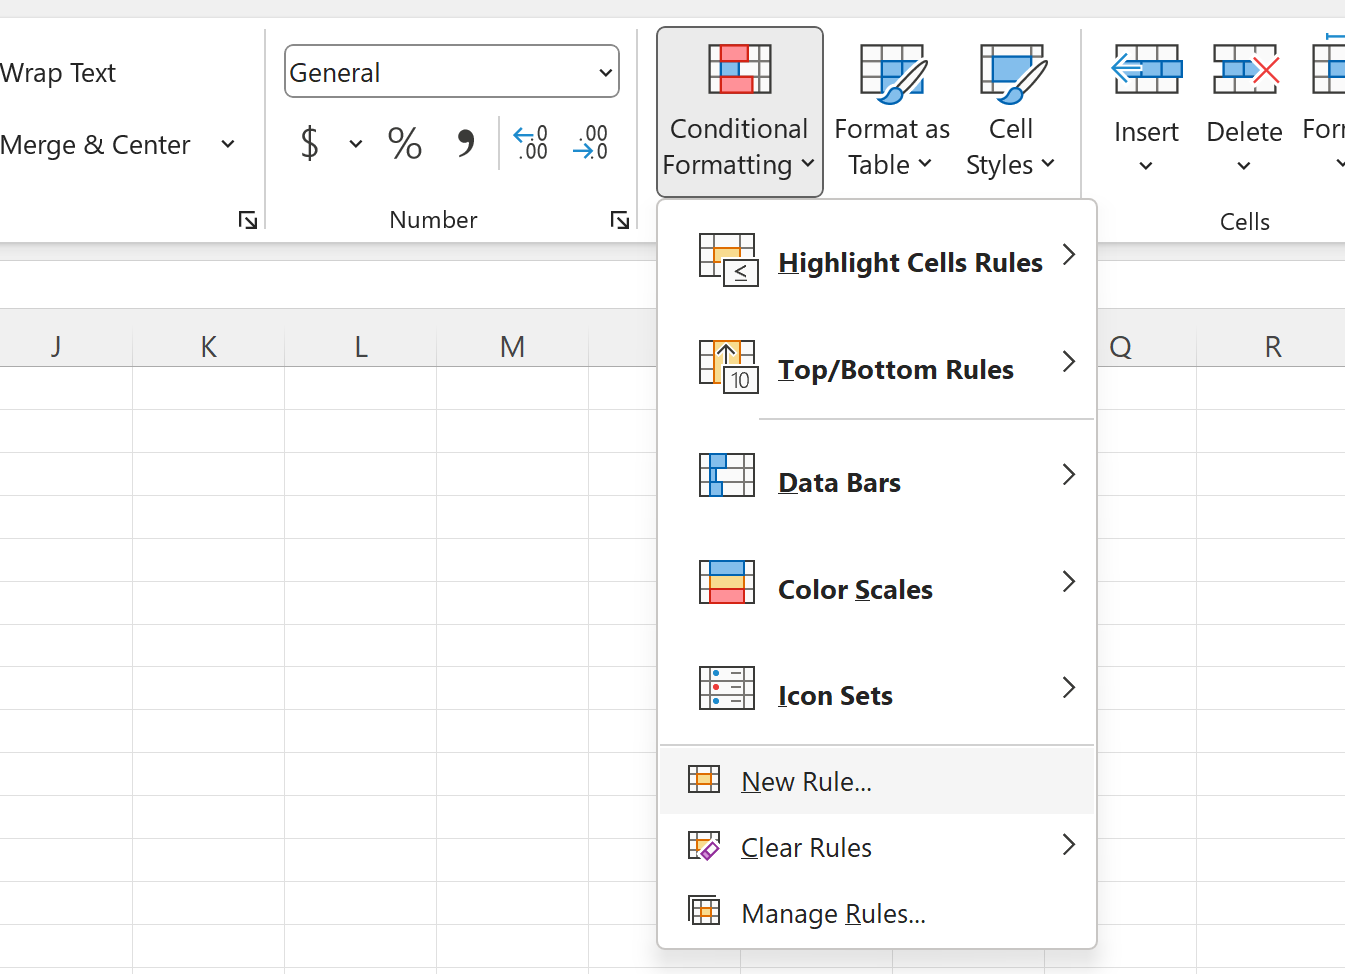
- Go to the "Home" tab and click on "Conditional Formatting."
- Select "New Rule" and choose "Use a formula to determine which cells to format."
- Enter a formula that checks the value of the cell. For example, if your dropdown list contains "High," "Medium," and "Low," you can use formulas like
=A1="High"to apply a specific color. - Choose the formatting you want to apply (e.g., fill color, font color).
- Click "OK" to save your rule.
Now, whenever you select an option from your dropdown list, the cell will automatically change color based on your rules. Cool, right?
Tips for Conditional Formatting
- Use contrasting colors for better visibility.
- Limit the number of colors to avoid confusion.
- Test your rules to ensure they work as expected.
Creating a Color-Coded Dropdown List
Now that you know how to apply colors using conditional formatting, let's take it a step further. A color-coded dropdown list combines the power of dropdowns and colors to create a visually appealing and functional spreadsheet. Here's how you can create one:
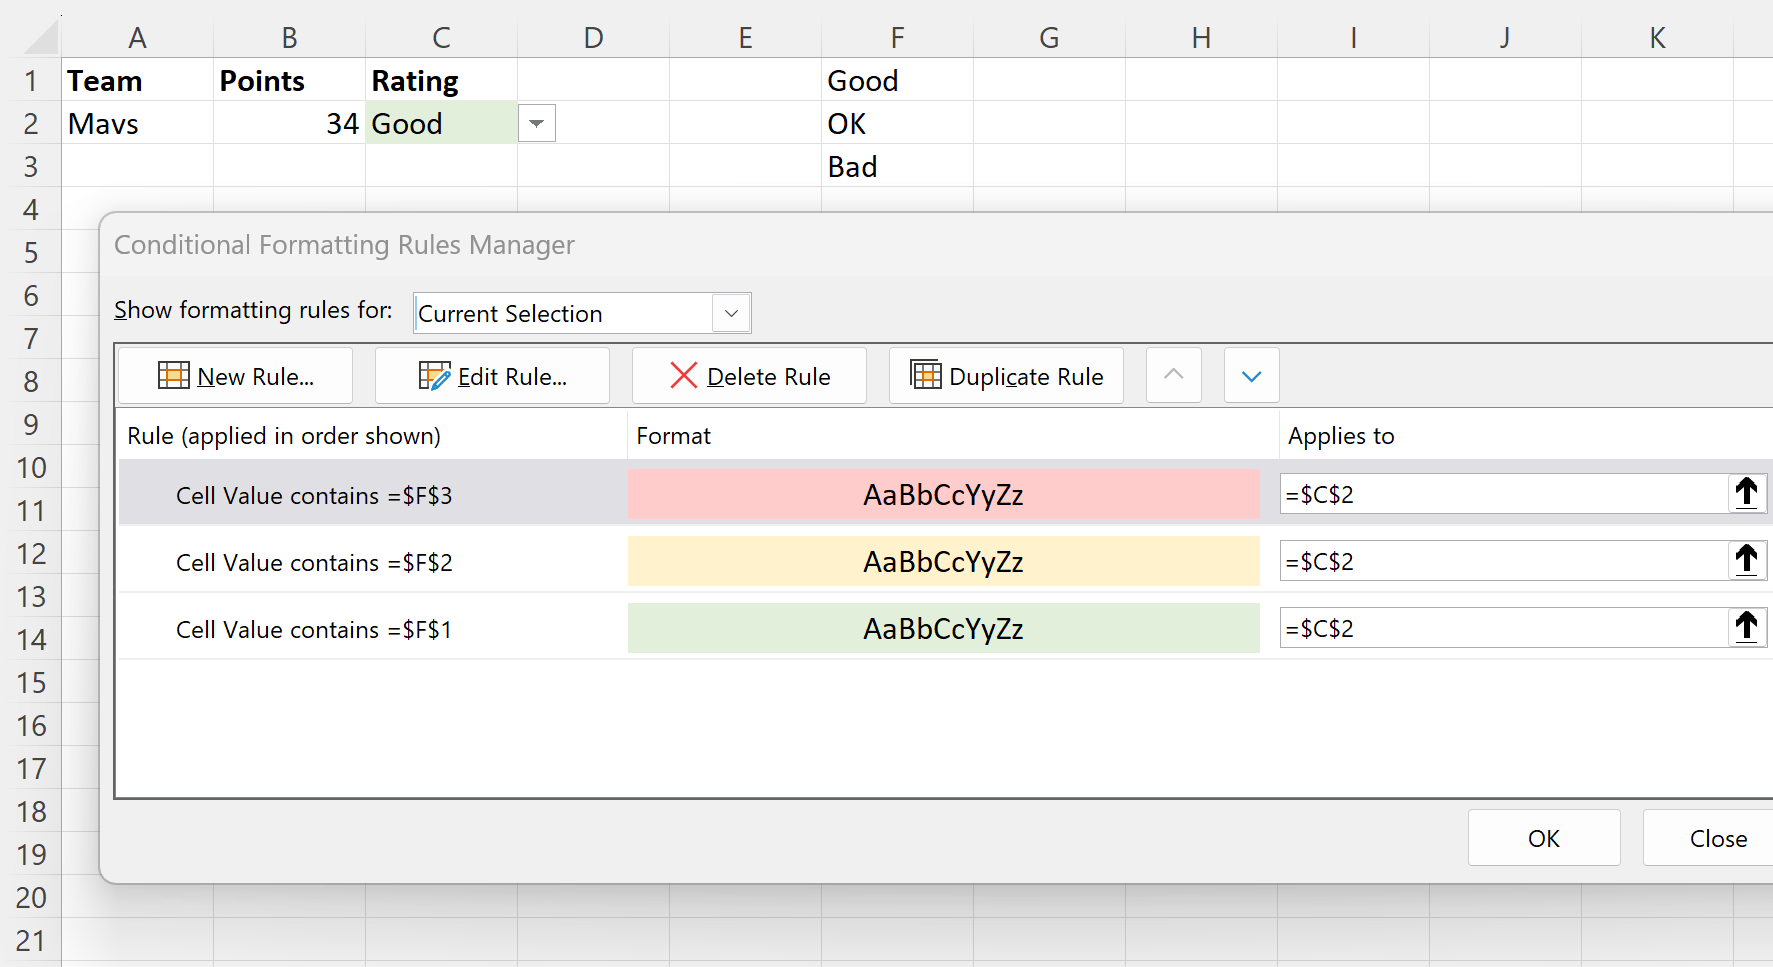
- Create a table with your dropdown options and corresponding colors.
- Use the table to apply conditional formatting rules to your dropdown cells.
- Test your dropdown list to ensure the colors match the options.
For example, if you're tracking project statuses, you could create a table like this:
| Status | Color |
|---|---|
| Completed | Green |
| In Progress | Yellow |
| Overdue | Red |
By linking your dropdown list to this table, you can ensure consistency and accuracy in your colors.
Advanced Techniques
- Use VBA (Visual Basic for Applications) for more complex color-coding.
- Combine multiple conditional formatting rules for layered effects.
- Experiment with different color schemes to find what works best for your data.
Building a Dynamic Dropdown List
Dynamic dropdown lists are like the superheroes of Excel. They automatically update based on changes in your data. To create a dynamic dropdown list, follow these steps:
- Create a named range for your dropdown options.
- Use the "Offset" function to dynamically adjust the range based on your data.
- Apply the named range to your dropdown list.
This way, whenever you add or remove options from your list, the dropdown will automatically update. It's like magic, but with spreadsheets!
Customizing Your Dropdown List
Customization is the key to making your dropdown lists truly unique. Whether you want to change the font, adjust the size, or add icons, Excel has got you covered. Here are some customization tips:
- Use the "Font" tab to change the appearance of your dropdown options.
- Add data validation messages to guide users when selecting options.
- Experiment with different dropdown styles to find what works best for your data.
Remember, the goal is to make your dropdown list as user-friendly and visually appealing as possible.
Troubleshooting Common Issues
Even the best Excel wizards run into issues sometimes. Here are some common problems you might encounter when creating dropdown lists with colors, along with their solutions:
- Colors not applying: Double-check your conditional formatting rules to ensure they match your dropdown options.
- Dropdown list not updating: Make sure your named range is correctly linked to your data source.
- Errors in data validation: Verify that your source range is correctly specified in the data validation settings.
Don't worry if things don't work perfectly the first time. Excel is all about trial and error. Keep experimenting until you get it right.
Real-World Examples
Let's take a look at some real-world examples of how dropdown lists with colors can be used in different scenarios:
- Project Management: Use colors to track task statuses and deadlines.
- Inventory Management: Highlight stock levels with colors to indicate availability.
- Customer Support: Categorize customer queries with colors to prioritize responses.
These examples show just how versatile dropdown lists with colors can be. The possibilities are endless!
Best Practices for Using Dropdown Lists
To get the most out of your dropdown lists, follow these best practices:
- Keep your dropdown options concise and relevant.
- Test your lists thoroughly to ensure they work as intended.
- Use colors consistently to avoid confusion.
- Document your rules and settings for future reference.
By following these tips, you'll be well on your way to becoming an Excel dropdown list expert.
Final Thoughts
And there you have it, folks! A comprehensive guide to creating colorful dropdown lists in Excel. Whether you're a beginner or a seasoned pro, there's something here for everyone. Remember, the key to mastering Excel is practice, practice, practice.
So, what are you waiting for? Open up Excel and start experimenting with dropdown lists and colors. And don't forget to share your creations with the world. Who knows? You might just inspire someone else to take their Excel skills to the next level.
Got any questions or feedback? Drop a comment below, and let's keep the conversation going. Happy Excel-ing!
Excel Comment créer une liste déroulante avec des couleurs Statorials
Excel Comment créer une liste déroulante avec des couleurs Statorials
Excel Comment créer une liste déroulante avec des couleurs Statorials
